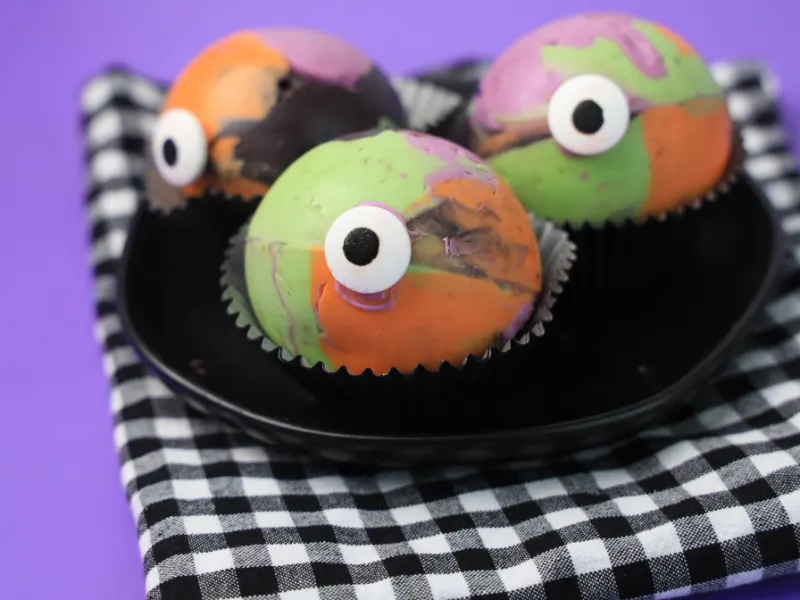
These Hocus Pocus Hot Chocolate Bombs won’t smell like children, but they will smell like sweet chocolate and remind you of the Sanderson Sisters of Hocus Pocus.

I just love Halloween time and always watch Hocus Pocus at least once (maybe more, lol) each Halloween season. This year is even more special since Hocus pocus 2 is coming out. We have been waiting for over 20 years for the next chapter. I know I am excited, how about you? Hocus Pocus 2 premieres Sept. 30 on Disney+.
What will Hocus Pocus 2 be about? Three young women accidentally bring the Sanderson sisters back to modern-day Salem and must figure out how to stop the child-hungry witches from wreaking a new kind of havoc on the world.
Hocus Pocus Hot Chocolate Bombs
This recipe is pretty simple and more artistic so be sure to get the kids involved with proper adult supervision.
You will just need a few key ingredients and 1 kitchen item you might not have.
Ingredients:
1 cup black chocolate candy melts – For candy melts, I find them usually at Walmart or Target for fair prices.
1 cup orange candy melts
1 cup lavender candy melts
1 cup light green candy melts
16 or so mini marshmallows
6 tablespoons hot chocolate mix ( I prefer Swiss Miss but any mix will do).
3 Candy Eyeballls
Silicone Dome Mold
How to Make Hocus Pocus Hot Cocoa Bombs
- Melt the black, purple, green, and orange candy melts as directed on the package.


2. Drop black candy melts in two spots in the dome mold. Drop orange candy melts opposite the black candy melts in the dome mold. Repeat this with the purple and the green. Lightly swirl the back of a spoon while coating the mold.

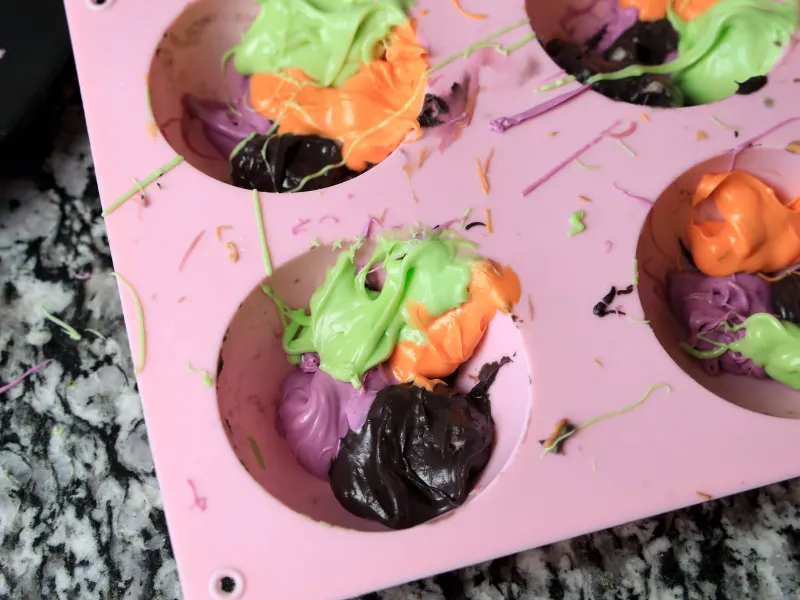
3. Make sure you cannot see the mold through the candy melts. Place in the freezer for 10 minutes.
4. Once the candy melts are hardened remove the domes carefully. When the chocolate is set, it will be shiny and snappy and release easily from the molds. Set aside.
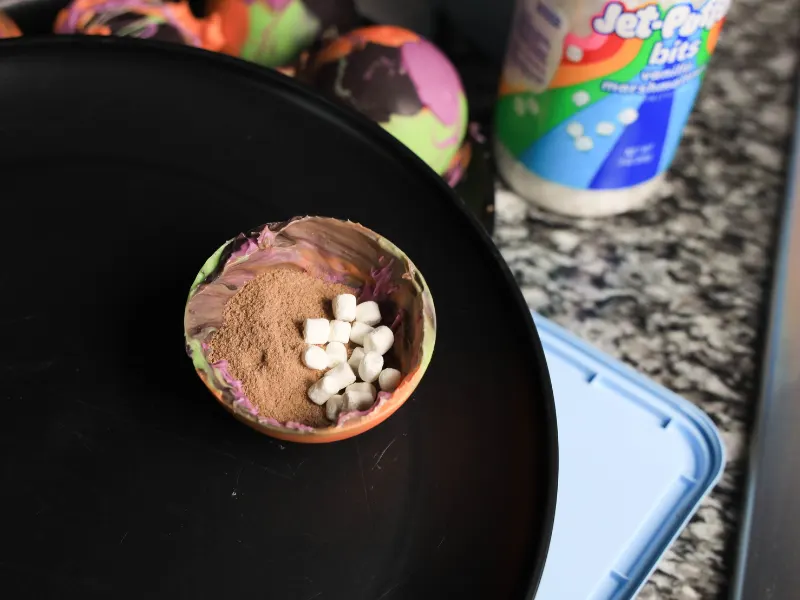
5. Heat a frying pan to low heat. Place the bomb edge side down into the pan. Melt slightly just to even out edges. Pull it up and fill it with two tablespoons of hot chocolate mix and marshmallows.

6. Quickly heat another dome edge and place it on top of the one with the cocoa mix. Make sure to align the domes well. Repeat for the other two hot chocolate bombs.
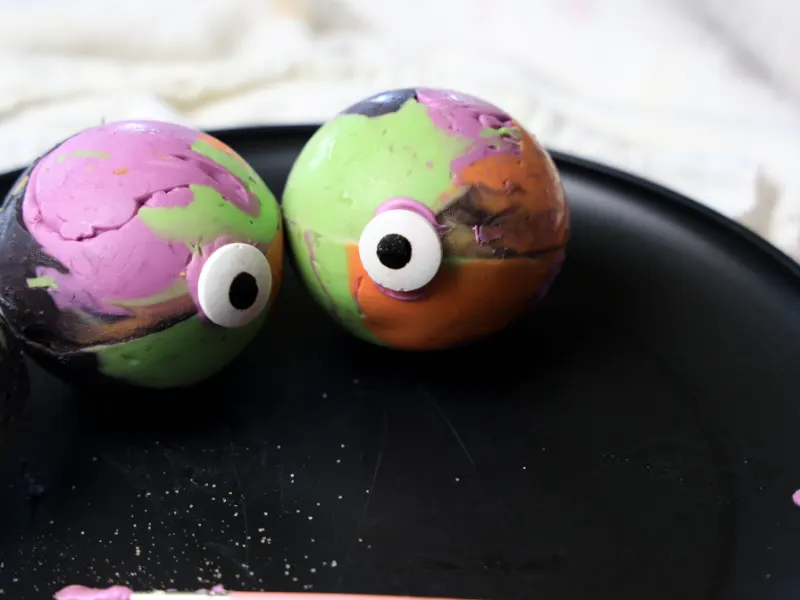
7. Use chocolate that has almost cooled and paint the back of a candy eyeball and place onto the hot chocolate bomb. Do not use hot chocolate or it will melt the bomb. Use cooled but still soft chocolate. This will adhere the eye to the bomb.
8. Keep in the fridge until ready to drink. If you need to keep longer place in the freezer for up to a month.
9. To prepare hot chocolate: Place the hot chocolate bomb in a mug; add 1 cup of warm milk and stir to dissolve.

First time making Hot Chocolate Bombs? Here are some tips to help you make this fun, themed treat for your Hocus Pocus Movie Night!

- Practice makes perfect. But who needs perfection? The first couple of times you make these they may not come out perfectly round or smooth. That is completely ok. Over time you will perfect your skills. You can tell mine are a little rough. They are homemade and your loved ones will love ’em.
- You “Burnt” You Chocolate. Sometimes getting the candy melts melted without the chocolate not seizing can be tricky. If the chocolate gets chunky, try some coconut or olive oil to get the chocolate to the right consistency.
- Be Gentle. Be gentle when sealing the bombs together, don’t push too hard.
Hot Chocolate Bombs Recipe
Hocus Pocus Hot Chocolate Bombs


Ingredients
- 1 cup Black Chocolate Candy Melts
- 1 cup Orange Candy Melts
- 1 cup Lavendar Candy Melts
- 1 cup Light Green Candy Mmelts
- 16 Marshmallows
- 6 tablespoons Hot Chocolate Mix
- 3 Candy Eyeballls
- Dome Mold
Instructions
- Melt the black, purple, green, and orange candy melts as directed on the package.
- Drop black candy melts in two spots in the dome mold. Drop orange candy melts opposite the black candy melts in the dome mold. Repeat this with the purple and the green. Lightly swirl the back of a spoon while coating the mold.
- Make sure you cannot see the mold through the candy melts. Place in the freezer for 10 minutes.
- Once the candy melts are hardened remove the domes carefully. Set aside.
- Heat a frying pan to low heat. Place the bomb edge side down into the pan. Melt slightly just to even out edges. Pull it up and fill with two tablespoons of hot chocolate mix and marshmallows.
- Quickly heat another dome edge and place on top of the one with the cocoa mix. Make sure to align the domes well. Repeat for the other two hot chocolate bombs.
- Use chocolate that has almost cooled and paint the back of a candy eyeball and place onto the hot chocolate bomb. Do not use hot chocolate or it will melt the bomb. Use cooled but still soft chocolate. This will adhere the eye to the bomb.
- Keep in the fridge until ready to drink. If you need to keep longer place in the freezer for up to a month.
Nutrition Information:
Yield:
3Serving Size:
1Amount Per Serving: Calories: 1299Total Fat: 19gSaturated Fat: 12gTrans Fat: 0gUnsaturated Fat: 6gCholesterol: 13mgSodium: 418mgCarbohydrates: 274gFiber: 5gSugar: 192gProtein: 9g
PixieDustedJourneys, occasionally offers nutritional information for the recipes contained on this site. This information is provided as a courtesy and is an estimate only. This information comes from online calculators. Although PixieDustedJourneys.com attempts to provide accurate nutritional information, these figures are only estimates.